1 container of anti-seize rated at 1800 degrees or higher.
NOTE: In the following instructions, when a bolt is referred to as a "14mm" for example, this indicates the size of the wrench required to remove it, not the shank size as is standard.
These instructions are destructive to the stock exhaust. It is possible to remove the stock b-pipe without cutting it, but it requires more time and/or a lift.
Ensure that the rear of the car is elevated and properly supported with jack stands or ramps to allow access to the downpipe or primary cat, and that the car has properly cooled down ~45 minutes.
Step 1: (TURBO)
Using the sawzall or hack saw, cut the b-pipe just after it comes over the rear cross-member on the bend behind the rear anti-sway bar, but before the 2 12mm head bolts that hold the b-pipe to the muffler.
Step 1: (NA)
Remove the 2 12mm bolts holding the b-pipe to the muffler at the support near the center of the muffler, and remove the 2 14mm bolts holding the b-pipe to the muffler inlet pipe.
Step 2:
Remove the 3 nuts/bolts that connect the b-pipe to the downpipe or primary cat.
Step 3: (TURBO)
Wiggle the now loose part of the b-pipe out of the rear cross member support, and pull it out from under the car.
Step 3: (NA)
Wiggle the now loose b-pipe down. Place a block of wood on the jack pad, and jack under the rear cross member to a height of 24" below the rear cross member. While the car is at that height, pull the front end of the b-pipe toward the driver's side of the car while wrigling it out over the rear crossmember toward the front of the car.
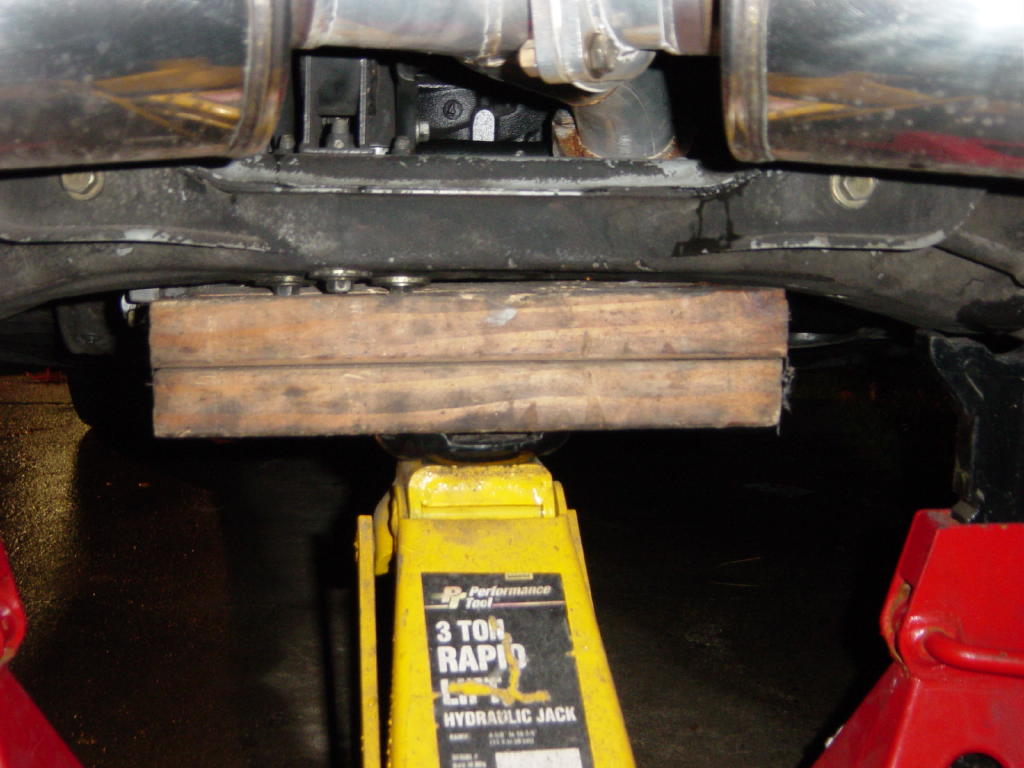
Lower the front edge of the b-pipe
Step 4:
Remove the 2 bolts holding the muffler up to the exhaust mounts (17mm head bolts), and remove the remainder of the stock exhaust.
Step 5:
Remove the 2 12mm bolts that hold the triangular rubber dampener (looks like a wedge of cheese) onto the rear cross member.
WHEW! Look at that crappy POS that was bottlenecking your performance! If you remove the heat shields on the exhaust you can see how small the pipe really is. Also if you cut the pipe off at one end of the flex joint, you can look in and see how much smaller the flex joint goes in it's middle (approx 1.8" ID).
Step 6:
Using one of the 2.5" Percy's or Remflex gaskets and 3 of the 9/16" bolts, flat washers, lock washers, and nuts supplied with the TKO exhaust (be sure to anti-seize the bolts), bolt the two muffler sections together out of the car.
**This step can be done in the car, though more difficult, in the case of a rear body skirt such as that supplied with some aftermarket body kits, but it is HIGHLY recommended to bolt the two mufflers together out of the car.
Step 7:
Using the 3" Percy's or Remflex gasket supplied with the TKO exhaust, bolt the b-pipe flex section to the downpipe/primary catalytic converter (be sure to use anti-seize).
If you aren't sure which side of the b-pipe goes to the downpipe - it is the side of the b-pipe that has less bend angle on it. Contact us if you aren't sure which way this goes.
**The gasket's holes may need to be enlarged slightly to fit over the primary catalytic converter studs.
**BE SURE TO LEAVE THESE NUTS/BOLTS LOOSE OR JUST STARTED ONLY UNTIL ALL PARTS ARE INSTALLED AND ALL BOLTS STARTED.
Step 8:
Now install the muffler assembly. Slide the forward reaching pipe over the cross member and lift up on the rear of the mufflers to line up the holes with the stock exhaust mounting locations. Slide the 2 19mm bolts through the mounts and tabs in the exhaust. Start the nuts on the 2 bolts with some anti-seize on the threads first.
**Note that the left side or driver's side TKO mounting tab goes in behind (toward the rear of the car) the exhaust mount, while the right side/passenger side tab goes in front of its mount (toward front of the car).
Step 9:
Instert the last 3.0" for 3" TKO or 2.5" for 2.5" TKO Percy's or Remflex gasket and 3 of the 9/16" bolts, flat washers, lock washers, and nuts (with yet again some more anti-seize -- seeing a trend here?) to connect the muffler assembly to the b-pipe.
Step 10:
Tighten all fasteners until the lock washers are properly crushed flat.
Now ENJOY!
Final Notes:
- Thank you for purchasing a KO Racing TKO Exhaust system and I hope you enjoy it as much as I enjoyed making it for you.